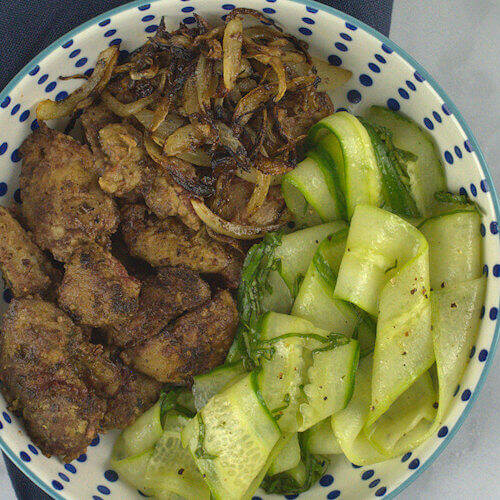
Rich Chicken Livers with Cucumber Ribbons. When cooked well, chicken livers are tender; the meat is dense, delicate and flavorful. The Cucumber is a nice contrasting flavor, refreshing may be appropriate.

I know that some of you may not like chicken livers. In all honesty, have you ever tried them, or is just the thought of eating livers turning you off?
Oh, I wish I could change your mind. Chicken livers are absolutely delicious. Easy and quick to cook and when done right a very tender meat.
A few things you need to know about chicken livers:
- Fresh chicken livers have a deep dark pink color and are shiny. Old chicken livers may look grey and brown.
- Chicken livers are NOT smelly – They ‘smell’ the same as any fresh meat. Kidneys may be one of the organ meats that is the exception.
- Chicken livers are NOT bad for you. Chicken livers are high in protein, iron, vitamin A, folate, pantothenic acid, riboflavin and B12. They are high in fat and cholesterol, so they should be eaten in limited amount and it is best for people at risk for heart disease to avoid eating liver.
- Chicken livers are NOT expensive. On the contrary, chicken livers are relatively cheap.
- Chicken livers do NOT taste horrible (that what some people say), but they don’t. When cooked well, they are moist and delicate.
This Chicken Livers with Cucumber Ribbons recipe is a basic one. From here you can start diversifying. In the future I will make one of more recipes with chicken livers that will involve more ingredients.
How to Make Chicken Livers with Cucumber Ribbons
Step 1. Rinse and trim the livers
Place the chicken livers in a bowl and fill it with cold water. Leave them in the cold water for about 15 minutes, then drain. The soaking allows any blood or other fluids to be cleaned off the liver.
Trim all the membranes and connective tissue off the chicken livers. You may also find some coagulated blood or blood vessels; cut those away as well. I always us a pair of kitchen scissors. Then dry the chicken livers with a paper towel.
You can see on the left hand side the chicken livers with connective tissue and some blood vessels and on the right hand side the cleaned ones.

Step 2 – Season and coat the chicken livers
As said earlier, this is a basic recipe, so only season with salt and pepper. Then lightly coat the chicken livers with flour. You can also use cornmeal or breadcrumbs or you can even do without a coating. I prefer flour because it keeps the moisture inside the liver, without adding a heavy coat.
Cook the chicken livers in butter and cook them on medium-high heat quickly. Turn them after about 2-3 minutes. They should be brown and crisp on the outside and still slightly pink on the inside.

When I was young we always ate chicken livers with caramelized onions and bacon. For this recipe I only selected to use onions. You can caramelize them in a separate skillet or in the same, by start with cooking the onions and add the livers when the onions start to color.
Cook the chicken livers in butter on medium-high heat and cook them quickly. Turning them after 2-3 minutes and finish them when they are brown and crisp on both sides but still pink on inside. When you cook the onions in the same skillet, make sure not to burn them.
You can serve the chicken livers with almost anything. Like mashed potatoes, rice, pasta, vegetables, or a salad.

To make the cucumber ribbons, all you need is a vegetable peeler. Peel the cucumber, but leave some of the green skin on. This will give a nice color effect. Then cut ribbons with the same vegetable peeler, a cheese slicer or a mandolin. I like to keep the seeds in the cucumber as it gives some extra ‘freshness’ to the salad.
Soak the ribbons in a mix of olive oil, lemon juice, salt, pepper and and basil. Serve these ribbons as well as the caramelized onion with the chicken livers.

Chicken Livers with Cucumber Ribbons
Ingredients
- 4 ounces chicken livers
- salt and pepper
- 2 tablespoons all-purpose flour
- 2 tablespoons butter
- 1/2 medium onion
- 1/2 English cucumber
- 2 tablespoons lemon juice
- 1/4 cup olive oil
- fresh basil
Instructions
- Start by making the cucumber ribbons. Peel the cucumber, but leave some of the skin on the cucumber. This will have a nice effect in the salad. Use a vegetable peeler, a cheese slicer or a mandolin to cut thin slices lengthwise of the cucumber (the ribbons). Transfer these ribbons to a bowl with olive oil, lemon juice, salt and pepper and basil.
- Place the chicken livers in a bowl and fill it with cold water. Soak them in the cold water for about 15 minutes, then drain. The soaking allows any blood or other fluids to be cleaned off the livers.
- Clean the onion and slice it thinly.
- Trim all the membranes and connective tissue off the chicken livers. You may also find some coagulated blood or blood vessels; cut that away as well. I always us a pair of kitchen scissors. Then dry the chicken livers with a paper towel.
- Heat 1 tablespoon of butter in a skillet on medium heat and add the onion and a pinch of salt. Sweat the onions and cook them until they start to color.
- Season the livers with salt and pepper and sprinkle them with flour, so they are evenly and thinly coated.
- Move the onions to one side of the skillet, add another tablespoon of butter and transfer the chicken livers into the empty part of the skillet.
- Increase the heat a little and cook the chicken livers quickly, turning them until brown and crisp on both sides but still pink on inside, about 4-5 minutes total. Keep an eye on the onions, you don’t want to burn them. Remove the livers and the onions from pan.
- Serve the chicken livers with the onions and the cucumber ribbons. Sprinkle basil over the cucumber.
Nutrition
Nutrition information is automatically calculated, so should only be used as an approximation.


2 Comments
monika
June 30, 2019 at 7:50 pmDo I NEED to use the flour?
I eat a low carbohydrate diet and need to omit flour…
Marinka
July 8, 2019 at 5:57 pmHi Monika;
No you don’t have to use flour, you can bake them without, or you could try coconut flour. If you bake them without any ‘coating’, just keep an eye on them while you bake, you don’t want to burn them before they are done.