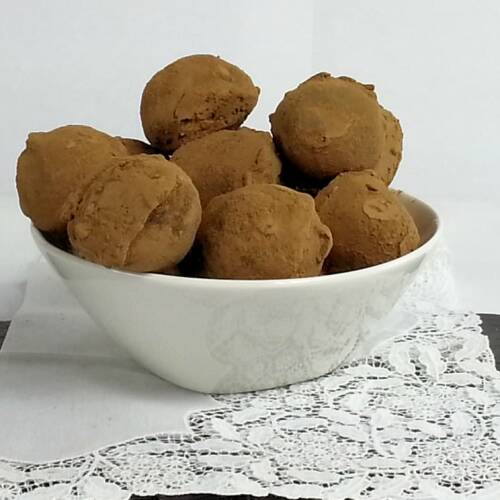
A couple of weeks ago I started taste testing these cream truffles, different types of sugar and sugar combinations. Today, just a day before Thanksgiving these little bombs of goodness, Hibiscus Cream Truffles should see the light of day. If you don’t have a dessert after your dessert, you should try these. They are so easy to make and make a great impression.

They are not chocolate truffles, but cream truffles, so a little less heavy. A creamy center, a chocolate coating and a dust of cocoa powder. When you bite these truffles you’ll hear the coating crack, but don’t expect something liquid to run into you mouth, you’ve just reach the creamy center.
You’re not looking for a dessert after your dessert? That’s fine, but don’t skip this recipe. Make it to enjoy, savor with your favorite tea or coffee during Thanksgiving Day. Just a little teaser into your Grand Finale Thanksgiving Dinner.

How to Make Hibiscus Cream Truffles?
Mix soft butter and sugar until light and creamy. For a plain version, I suggest you use powdered sugar only as that mixes well with the butter. Once this is all nice and fluffy, add the cream little by little until you have a homogeneous mixture. Ratio: equal amounts of butter and sugar and half the amount of cream. I used 4 oz. butter, 4 oz. sugar and 2 oz. of whipping cream.
When you use normal sugar, and you don’t want to end up with a truffle with sugar crystals in the center you will need to warm the cream and sugar. Cool this down and then add it to the creamy butter. So avoid that hassle and use powdered sugar. I used a mixture of half powdered sugar and half Hibiscus Sugar; this is an artisan sugar made from organic cane sugar, organic hibiscus flowers, lemon, orange. It is very fine sugar, adds just a little crunch to the center, of course a lot of extra flavor and a little bit of color.
Once you created the creamy mixture, it is time to make the truffle; pipe small mounds spaced 1 inch apart on the parchment paper covered baking sheet. You can also use a spoon and drop small mounds of mixture onto the baking sheet. Place them in the freezer for just a little bit and then you can roll them in your hand to make them a little bit rounder. They don’t have to be perfect. Place a tooth pick in each mound; this is your ‘handle’ during the coating.

Place them into the fridge for approx. 30 minutes and in the meantime, melt your chocolate for the coating. I used the darkest chocolate I could find, as that is my preferred chocolate. The lighter the chocolate, the sweeter. Since the center is sweet, a dark chocolate would be a better contrast, in my humble opinion. You can melt chocolate au-bain-marie or in the microwave. I always use the microwave method as that is fast.
Chocolate is melted, mounds have spent time in the fridge, now it is time to finish these truffles. Fill a wide bowl with cocoa powder. Whatever you don’t use, you can put back in the container. A fair amount of cocoa powder will make the dusting easier. So you will take one truffle by the horns, oh I mean by the toothpick, submerge it in the melted chocolate, swivel it around to get rid of the excess chocolate and then place it on the cocoa powder and use a spoon to cover the truffle. When you swivel the truffle, make sure you do that within your bowl, otherwise your apron or your clothes if you are not an apron cook, will have a nice horizontal coating of melted chocolate.
So my modus operandi for the Hibiscus Cream Truffle is mix, pipe, pin, dredge, roll, cool, share, enjoy, enjoy, enjoy, enjoy, enjoy until they’re gone.

Hibiscus Cream Truffles
Ingredients
- 4 ounces sugar (half powdered sugar, half Hibiscus Sugar)
- 4 ounces butter
- 2 ounces whipping cream
- 6 ounces dark chocolate
- cocoa powder for dusting
Instructions
- Whip butter and sugar together in a bowl until super creamy.
- Add whipping cream slowly until totally incorporated.
- Cover a baking sheet with parchment paper.
- Put mixture into piping bag and pipe small mounds spaced 1 inch apart on the parchment paper. You can also use a spoon and drop small mounds of mixture onto the baking sheet. Place a toothpick in each truffle.
- Place the baking sheet in the fridge for an hour or put it in the freezer for approx. 15 minutes.
- In the meantime melt the chocolate au-bain-marie or in the microwave.
- Scoop a fair amount of cocoa powder in a dish.
- Take a truffle by the toothpick and submerge it in the chocolate. Swivel it around to get rid of the excess chocolate.
- Place the truffle in the cocoa powder and use a spoon to cover it with the cocoa powder. Allow the cocoa powder to stick to the chocolate and the chocolate to harden just a few minutes.
- Place the truffles on a baking sheet and repeat process.
- Keep truffles refrigerated until you serve them.
Nutrition
Nutrition information is automatically calculated, so should only be used as an approximation.


No Comments